Showing posts with label Make. Show all posts

Wednesday, June 4, 2014

[make] Grocery Menu

Now that it is summer, I plan on tackling many of the organizational projects that I didn't have time (or energy) for during the school year. One of these projects is maintaining a monthly menu for our groceries, eating out, and vacation/traveling days. There are loads of cute ones on Pinterest, but sometimes you just have to make your own thing (minus the bells/whistles of "cute" menus, do you know what I mean?).

I have always had a "menu" of sorts, but it has never been organized enough to where Nate and I were confident in the meals we were going to eat... not in that we didn't HAVE food, I mean we would constantly find ourselves saying, "What do YOU want for dinner?", "I don't care, what do YOU want for dinner?" Agghh! Aggravating. So, insert monthly menu:


I have each day labeled with B, L, D, indicating the three meals of the day. For date nights, the dinner option is labeled "Out" (as are Sunday afternoons since we usually go eat with our "family group" after church). I also have vacation days highlighted out since those will be separate grocery trips and/or eating out, depending on the location. We take two semi-big grocery trips a month, so we shop for two weeks at a time.

For breakfast most days, we will be having green smoothies: we JUST bought a Magic Bullet to create yummy green smoothies and I will be posting recipes soon. It's the main way I will be getting my "greens" since my name is Chrissy, I'm 27 years old, and I do not eat vegetables. I know, I know.

For lunch, we are going for easy, simple, or leftovers. Yep, there are some frozen meals featured. Don't judge. Nate is still working during the week and I'll be helping him out at the office or I'll be doing stuff at home. The last thing we want to have is dirty dishes sitting out from an extravagant lunch menu. Nope.

Dinners are "themed": you will notice this under the days of the week:

Sundays- Comfort Food. Will most likely be made with a crock pot since Sundays are our relaxation and napping days.

Mondays- Taco Night, our favorite night! Nate makes his homemade guacamole and we use corn tortillas to make beef street tacos with taco rice (made from a package: keeping it real)

Tuesdays- Casserole night: this will create lots of leftovers for us to eat for lunch the next day (and who doesn't like an easy casserole?)

Wednesdays- OUT. We have church Wednesday nights until 8pm and we usually don't feel like cooking something that late. And to be honest, we usually go to Whataburger or Wendy's :)

Thursdays- Italian Night, self explanatory. 

Fridays- New Recipe Night, courtesy of Pinterest. Nate also enjoys cooking and since he is off Friday, this day will give us time to cook together in the kitchen and experiment with whatever meal we will be making that evening.

Saturdays- Big Breakfast Day, because lunches are usually simple/easy/quick so we can go out and have a Date Night!

So there you have it: my attempt to have a somewhat organized meal schedule for the week. I think Nate's excited about it too but we will see how it goes when it comes into play! Maybe I'll even post the recipes we create... Who knows! It is super easy to make your own: just create a new Word document, but as a calendar (there are oodles of templates on Word). Pick your month, and type in the calendar days! This could work for menus, scheduled events, anything you'd like!

Happy Wednesday! We have spent the first part of this week with Nathan's family and are now back home (or heading home by the time this posts at 12pm...).

Half of the week is over, and you may be dragging. Look to God for strength: pray for peace, comfort, and guidance in your day. Be still. Say thank you for all He has done for you! Let His light and goodness radiate from you, yes even on a Wednesday, and let others see Him in you!

"...but in your hearts honor Christ the Lord as holy, always being prepared to make a defense to anyone who asks you for a reason for the hope that is in you; yet do it with gentleness and respect..." 1 Peter 3:15

Sunday, August 4, 2013

[make] Book Page Garland

Yesterday, Nate and I went "junkin'" (garage/thrift store/estate sale hunting) with another couple who are friends of ours. We had such a good time rummaging through other people's treasures and making a few our own... we got some GREAT deals that I cannot wait to share with you!

One purchase I made was a hardcover book for $1. It was published in the late '50s and I had no desire to read it, but instead to use its yellowed pages for a craft... I wasn't sure what craft until I perused Pinterest and found Meegan's Book Page Garland... umm yes, I sure did make one too!


Old book. Torn pages. Fan pages into quarters (three folds). Hole punch in the middle and string onto twine. DONE. Super easy, but kind of time consuming. This garland hangs above our mirror in our dining room and it's a little over 100 pages. Not very long, but you can spread them out if you are covering a longer area. The way the pages spin on the twine is fun too!

I start in-service on Friday this week and then next week begins every.day.in-service. I suppose I can say "buh-bye" to summer, but it was a great one! Now to prep for my classroom :) The FUN part!

Have a wonderful week!

"When I am afraid, I put my trust in you." Psalm 56:3


See where I link up: Monday Made it @ 4th Grade Frolics, What I Whipped Up Wednesday @ Sugar and Dots, Craft-O-Manic Monday @ Craft-O-Manic, Monday Funday @ C.R.A.F.T./Lines Across/Uncommon Designs/That's What {Che} Said/Creatively Living, Whatever Goes Wednesday @ Someday Crafts, Show Me What Ya Got Linky Party @ Not JUST A Housewife, {Wow Me Wednesday} @ Ginger Snap Crafts, Link Party @ Destination: Craft, The Inspiration Exchange @ Clean & Scentsible (and others), Before & After Party @ Thrifty Decor Chick, Weekend Wrap-Up Party @ Tatertots and Jello, What I Wore Wednesday @ The Pleated Poppy

Thursday, July 4, 2013

[celebrate] Happy 4th of July!

We are a blessed nation to have the freedoms we have daily :) Thank you to all who are serving to protect those freedoms: we know that freedom is not free, and you all are a blessing to our country! May God continue to bless our country, our leaders, and our communities!

A few snippets from our 4th of July celebration, which started yesterday on the 3rd! The celebration will continue today as well!

*paper straws from World Market
*red/white/blue action within our silverware
*pretzel sticks and peanuts coated in white chocolate and red/white/blue sprinkles
*red/white/blue daisies from Walmart
*red vines wrapped in red/white/blue ribbon

Have a wonderful day celebrating our country! Remember that TRUE freedom comes through Christ, and it is through Him that we are able to have access to God, our Father in Heaven! Thank you Lord for Your wonderful mercy, love, and grace!

"Because of Christ and our faith in him, we can now come boldly and confidently into God's presence." Ephesians 3:12

Thursday, June 20, 2013

[make] Calligraphy Canvas Art

Well, I didn't have that many guesses as to what hymn I used for my version of calligraphy art, but here is what I did!


Did anyone internally guess "It Is Well With My Soul"? I just love that hymn. The story behind it, the power with the words. I thought it would be a fabulous reminder to have around the house.

I started with a blank canvas that I had originally painted something else on about three years ago, but I painted over it with gray and then distressed it some with a scrap of burlap fabric. I used a white art marker for the writing: I'm not sure where it's from because I inherited it from my aunt along with a b-u-n-c-h of other craft supplies. I'm sure you can find one at Hobby Lobby or Michael's.

I used a scratch piece of paper to make sure I knew all of the words in the right order, and then I sketched out how I wanted the calligraphy letters to look on each line. Of course, by the time I got to the bottom on the actual canvas, I ran out of room... but that's okay!

I used my white marker on the canvas and wrote slowly in cursive, adding little flairs here and there throughout the wording. 

This is how Emily's calligraphy trick works: the first picture is the original, and the second picture is the calligraphy trick. She adds a thicker line to all of her downward strokes. As in, when I write a "t", my marker starts at the top and goes down. As soon as the marker begins to go up for the letter "h", my thick line stops until my marker starts to go down again. I hope that makes sense, but if not you can always click the link above to see her explanation!


Ta-da! Isn't it gorgeous? I like how it looks like chalkboard since I used gray paint and a white pen. A happy accident since I was not intending to that originally! 

I hung it in our living room below our engagement canvas that people signed at our wedding [our photographer's idea: we took a photo in downtown Dallas, Deep Ellum, in front of a brick wall, and it now looks like graffiti with all of the signatures! Super cute idea!]. 

Who else is a fan of calligraphy? I am thinking about doing a large canvas piece next, but that makes me so nervous! It was fun though, very therapeutic to focus on the strokes and alignment of the words... Does that make me a nerd or what?

[P.S. Who is stuck watching Game 7 with their hubs? #iam #gospurs #onlybecausetheyarefromtexas #reallygomavs #cantstandspursorheat]

[P.P.S. I have 201 followers: you all followed through, yeaaa!!! Thanks!!!

Happy Thursday!

"Here is my servant whom I have chosen, the one I love, in whom I delight; I will put my Spirit on him, and he will proclaim justice to the nations." Matthew 12:18

Wednesday, June 19, 2013

[make] Calligraphy Inspiration

Do you read Emily's blog at Jones Design Company?  I adoreee her style both in the home and how she dresses, so classic and chic. Anyways, I think I've blogged about this before, but she teaches an easy way to do "calligraphy" by adding a thicker line to all of your downward strokes. That is my project this week, and ahem... I've already done it ;) BUT I will show you these inspiration photos before I reveal the finished product tomorrow!

This beautiful piece from Life Made Lovely


This gorgeous art from Kate's Letters (etsy shop)
Source: etsy.com via Chrissy on Pinterest


And this piece from The Nester... stunning!


Classic hymns in beautiful lettering make for an amazing and sentimental piece of artwork. Hint: I also used a classic hymn... any guesses as to what it may be? I'll give you a multiple choice test and maybe you can guess ;)

a. "Great Is Thy Faithfulness"
b. "It Is Well With My Soul"
c. "How Great Thou Art"
d. "To God Be The Glory"

This should be fun! Check in tomorrow to see which hymn I used for my piece of art.

Happy Wednesday!

"The Lord has done great things for us, and we are filled with joy." Psalm 126:3

Monday, June 17, 2013

[make] Chalkboard Glass Bottles

Another summer project crossed off the list! And it is s-u-p-e-r easy too. I actually finished these well before my vacation last week, but we were too busy having fun for me to write a blog post on it! I figured you all would understand :)


I used an old Mason jar, a Sta*bucks Frappucino bottle, and a Sweet Tea bottle. Any glass would work, really! Just depends what you'd like to use.

This stuff is fantastic. Chalkboard spray paint, yes ma'am. 

I took the bottles outside and used an old gift box top that I had on hand as their base to stand on while they got their new look... I did two coats on them, plus laid them on their sides so I could get the bottoms. Consistent spraying back and forth will prevent drips (although I did have a couple of drips still... ugh).


I love the way they look vintage-y and matted. These would look awesome if you had a bunch lined up on a shelf too!


But the fun does not stop there. I plan on using a 3-lettered "theme" word for each month to write on the bottles. This may change over time if I move them to another place in my house, but for now, they will be themed art :) June's word is "SUN" since summer is officially here!


Here's what I have for the other month's so far... the ones that are blank I cannot think of a 3-lettered word that "goes" with that month: I only have half of the months figured out!!! If you have any suggestions, feel free to share!

Jan:
Feb: LUV
Mar:
Apr:
May:
June: SUN
July: USA
Aug: ABC (Since I'm a teacher and all, and it's back to school time!)
Sept:
Oct: BOO
Nov:
Dec: JOY

Happy Monday!

"So I commend the enjoyment of life, because there is nothing better for a person under the sun than to eat and drink and be glad. Then joy will accompany them in their toil all the days of the life God has given them under the sun." Ecclesiastes 8:15


***update: I just noticed that I am TWO followers away from 200. I mean, I know that isn't a big number for many because so many of you are well past that! BUT one of my 30 before 30 (I mean, that is still 3 and a half years away, so I've got time) is to get 1,000 followers. Let's see if I can make it to 200 by the end of the day or at least the end of the week! Tell your friends ;)


See where I link up: Monday Made it @ 4th Grade Frolics, What I Whipped Up Wednesday @ Sugar and Dots, Craft-O-Manic Monday @ Craft-O-Manic, Monday Funday @ C.R.A.F.T./Lines Across/Uncommon Designs/That's What {Che} Said/Creatively Living, Whatever Goes Wednesday @ Someday Crafts, Show Me What Ya Got Linky Party @ Not JUST A Housewife, {Wow Me Wednesday} @ Ginger Snap Crafts, Link Party @ Destination: Craft, The Inspiration Exchange @ Clean & Scentsible (and others), Before & After Party @ Thrifty Decor Chick, Weekend Wrap-Up Party @ Tatertots and Jello, What I Wore Wednesday @ The Pleated Poppy 

Sunday, June 2, 2013

[make] Chalkboard Bottle Inspiration

Hello, hello!

I hope everyone has had a fabulous weekend so far! We have had a relaxing weekend with no plans, no time frames of places to be... It has been great! However, today after church, I totally tripped and fell IN THE MIDDLE OF THE STREET. I have small spots skinned on my elbow and knee, most likely bruised hip, but the thing that hurt the most was my pride: ha! My wedges will not be worn at church again, although my giant purse helped cushion the fall a bit!!! It is scary to fall as an adult!

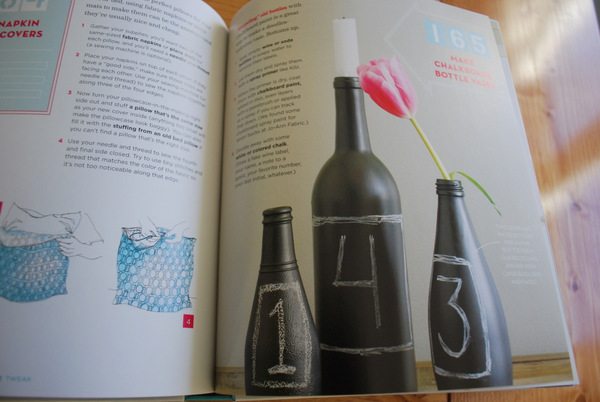
Anyways, this week's inspiration project that I **hope** to complete are these gorgeous chalkboard bottles. I first saw them in Young House Love's book:
[via The Sweetest Digs: who actually met John and Sherry!]
Another version from Pinterest that caught my eye: 
[via DIY On the Cheap]
[via Yuppie Love]
Hopefully I will get these made this week! I am also participating in Sew Caroline's Instagram link up for June: a #handmadesummer! Every day, we are showcasing through Instagram a handmade object we have created. If you would like to join us, here is the info! Find @sewcaroline on Instagram and don't forget to follow me too @chrissydj :)
[via Sew Caroline]
 Have a wonderful week!

"Therefore encourage one another and build each other up, just as in fact you are doing." 1 Thessalonians 5:11

Friday, May 31, 2013

[make] Upholstered Bench Top

I did it! I conquered my first summer DIY project, as I mentioned in this post last Sunday. I followed through: go me!


Here's what I did:

Bench top
Quilt batting
Staple gun
1 yard of fabric
Scissors (not pictured)

Lay out your batting on top of the bench top and decide how many layers of batting you would like to have as your cushion. I had enough to keep the batting folded in half, as you can see in the second picture:

Flip your bench top over and lay it upside down on top of the batting. This is how you will staple the batting into the wood:

Start stapling by pulling the batting tightly so there are no bubbles, gaps, etc. As you staple, you can cut excess batting off from around the edges. Remember, this is a bench top, so it will still need to be able to fit correctly on the bottom part of the bench!

Finagle the corners and their batting by stapling/cutting as needed. These little "nubs", for lack of a better word, keep the bench top sitting snugly on top of the bench, so make sure they are seen!

Ta-da! 1st step down.

Next up, lay your fabric over the top of the bench top, where the batting is, so you can cut it to size if needed. I trimmed about two inches off of the length, just so I wouldn't have as much fabric to pull taut while I was stapling. 

Flip the fabric/bench over. Same step as before: pull your fabric taut as you staple around the edge of the bench. This fabric has a subtle, repetitive pattern, so depending on what kind of fabric you use will depend if it needs to be aligned straight or if you can just cross your fingers and pray it turns out alright. I did the latter and it worked fine :) The fabric is slightly crooked in some places, but if you can point that out, shhhhhhh.... Don't tell anyone!

Finagle your corners again, trim, and admire your work. I'm sure there is an upholsterer (?) turning in his/her grave because my job isn't very neat or professional looking... but nobody will see this ugly side unless they lift the bench top to store things on the inside of the bench... And those people will only be myself or Nate... and we are very forgiving :)

Front side: smooth, no wrinkles, and the pattern looks pretty good!

I put the bench top back on the bench and Oliver immediately approved. What a swell guy.

Chloe wasn't too sure, so she stayed in our bed. And yes, our bed is not made. #keepingitreal

I am pretty proud of myself that I stuck with a project that I said I was going to complete in the same week! Stay tuned to see what next week's project will be... and it will be simple because I am going to Dallas next Thursday-Saturday :) So fun!

Happy Friday and happy weekend!

"Even to your old age and gray hairs I am he, I am he who will sustain you. I have made you and I will carry you; I will sustain you and I will rescue you." Isaiah 46:4


See where I link up: Monday Made it @ 4th Grade Frolics, Blog Hop @ Naptime Review, What I Whipped Up Wednesday @ Sugar and Dots, Craft-O-Manic Monday @ Craft-O-Manic, Monday Funday @ C.R.A.F.T./Lines Across/Uncommon Designs/That's What {Che} Said/Creatively Living, Whatever Goes Wednesday @ Someday Crafts, Show Me What Ya Got Linky Party @ Not JUST A Housewife, {Wow Me Wednesday} @ Ginger Snap Crafts, Link Party @ Destination: Craft, The Creative Spark @ Clean & Scentsible, Before & After Party @ Thrifty Decor Chick, Weekend Wrap-Up Party @ Tatertots and Jello, What I Wore Wednesday @ The Pleated Poppy